Building the Improbable mITX Hyper-Converged NAS with the Silverstone CS01-HS
For years, one of the most difficult tasks was to build a mITX system with plenty of CPU power and I/O in a compact 2.5″ chassis. When the CS01-HS came out, it was nearly impossible as one was always making major tradeoffs. Adding a storage controller could mean no NVMe or no 10GbE. This is not true anymore. We decided our build would “max” out the system.
Here is the build list, largely driven by what was “cool” and in the lab at the time:
- CPU: Intel Atom C3958 16 core SoC
- Motherboard: Supermicro A2SDi-H-TP4F
- RAM: 128GB (4x 32GB) DDR4-2400 RDIMMs
- Hard Drives: 6x Seagate 4TB 2.5″ SATA HDDs
- SATA SSDs: 2x Samsung SM863 960GB
- Write Cache: 1x Intel Optane Memory m.2 64GB
- Read Cache: 1x Intel 750 400GB NVMe AIC
- Networking: 4x 10GbE (2x SFP+ and 2x 10Gbase-T)
- Case: Silverstone CS01-HS (black)
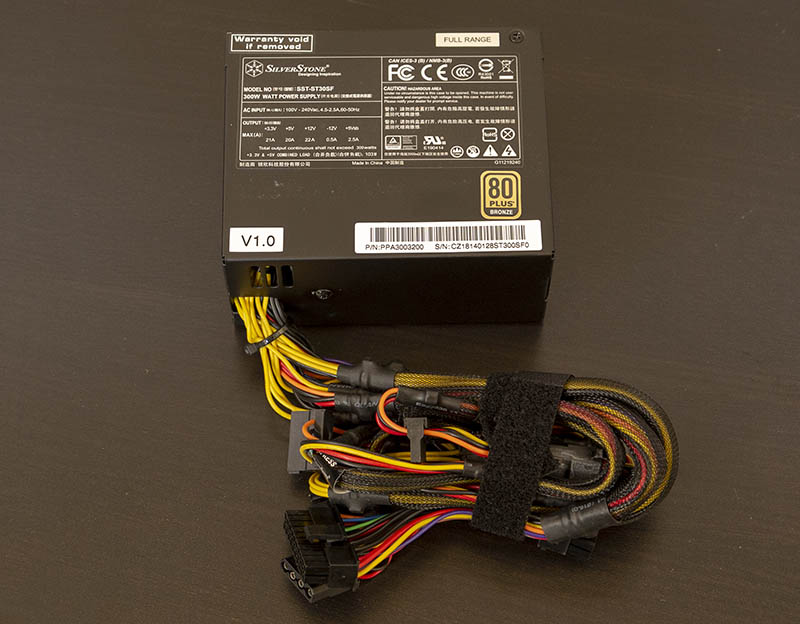
- PSU: Silverstone 300W SFX (SST-ST30SF)
With 16 cores, 128GB of RAM, 4x 10GbE NICs, disk storage, read and write cache drives, and bulk SATA SSDs, this is an absolutely awesome compact hyper-converged platform. The 2.5″ SATA SSDs are slow, but they are also lower power and having the read/ write cache drives will minimize the performance impact. There is another benefit, the drives use little power and are relatively quiet in operation. This is not inexpensive, but it is a far more complete solution than you can make in other chassis.

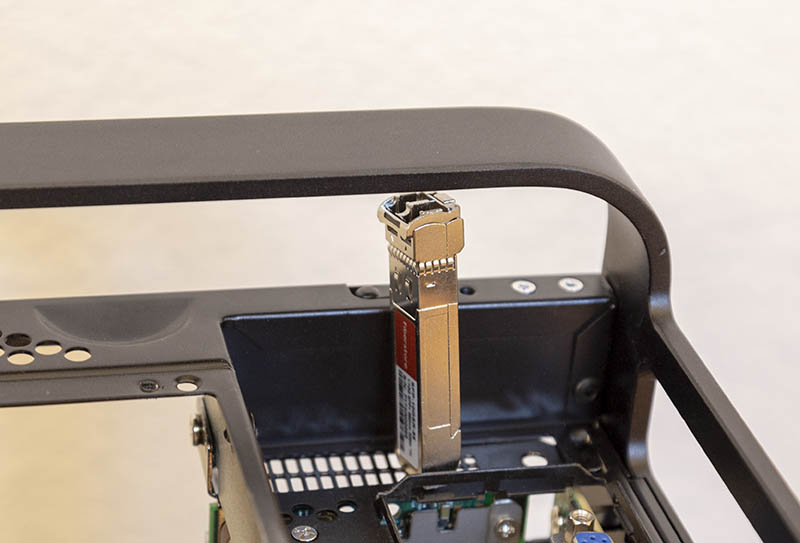
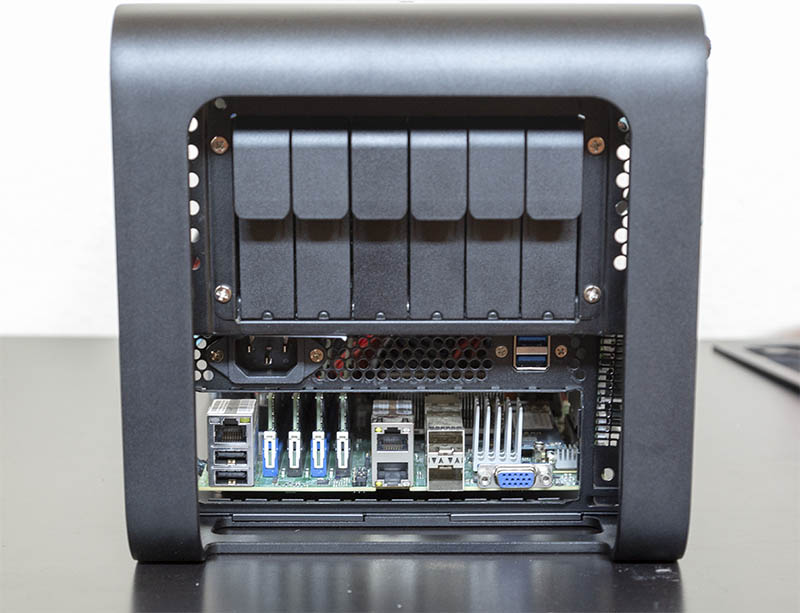
For those without high-speed networking onboard, you may be concerned with the metal handle placement above the low profile expansion slot. there is enough room to clear a SFP+ 10GbE optic, but there is not much more room here. We are using a NVMe device, but the potential to use the slot for networking is there.
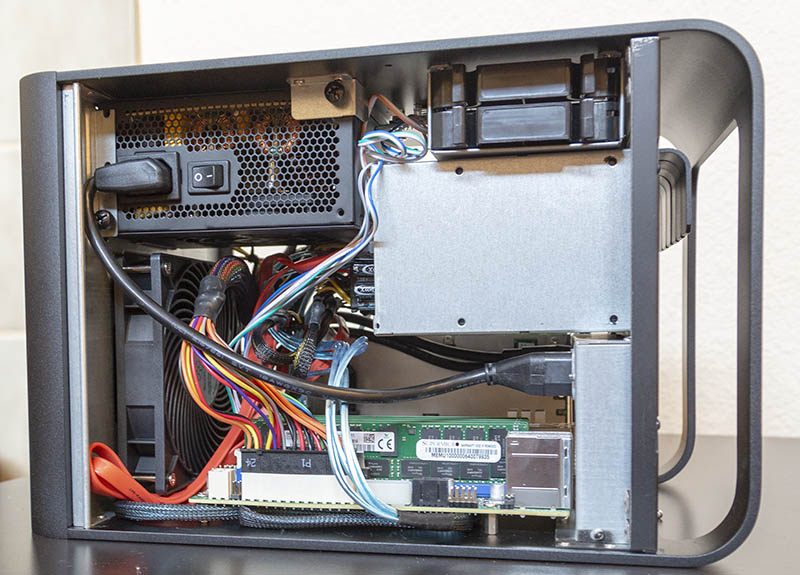
Building the system was a challenge. The Silverstone CS01-HS is relatively compact which is great for operation, but it is a little tight for installation. The motherboard sits vertically in the system. We ended up just hand tightening using a standard Philips head bit.
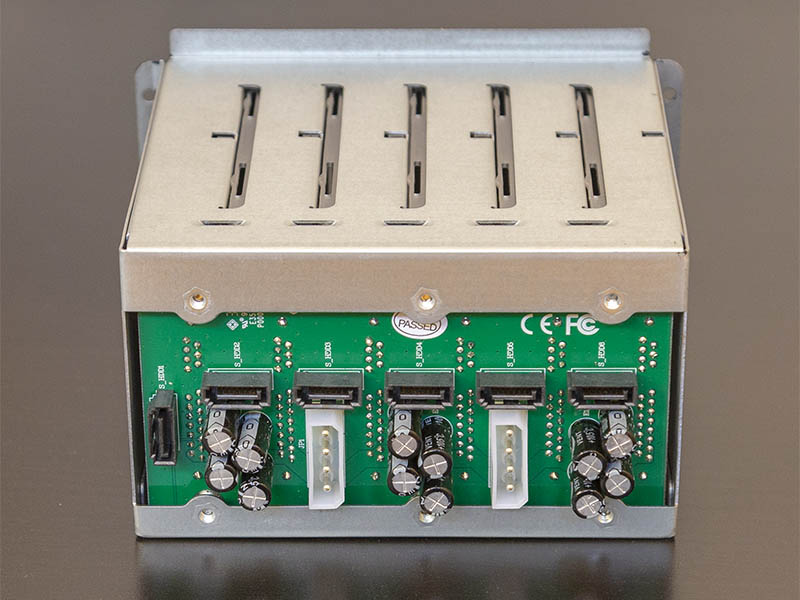
You have to remove the 6x 2.5″ assembly which helps with cabling but still does not leave room for a larger driver. Looking at the rear of the 6x 2.5″ hot swap bay backplane, we can see six 7-pin SATA connectors and two 4-pin Molex connectors. We would have liked if the SATA connectors were not so close to the power pins in the event you wanted to use right angle connectors to make more room during installation (more on this in pictures below.)
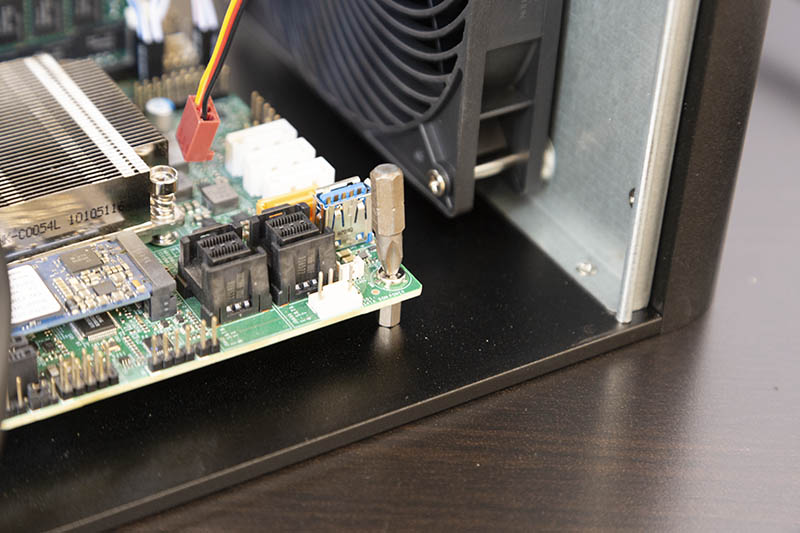
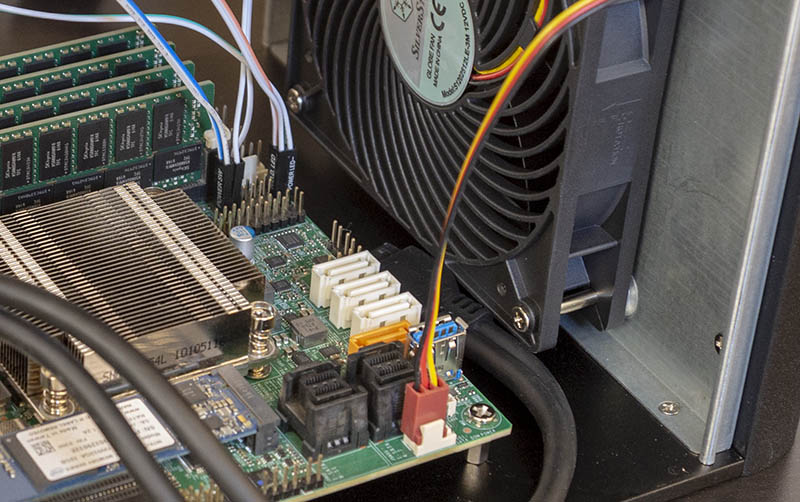
The 120mm fan is tuned for quiet operation and good airflow. Most users will be fine with this design. We were surprised that the fan was able to keep the 16 core SoC we are using and the 32GB DDR4 RDIMMs cool without a baffle. As we started the journey, we realized that this motherboard does not have a front panel USB 3.0 connector due to space constraints. One idea to clean up cabling would be to not install the front panel power/ reset/ LED cables. The reach on the cables was fine, but as we wire this up, they get in the way. Server motherboards have remote management so you can turn them on via management ports.
We asked Silverstone for a PSU recommendation. We received a few recommendations and ultimately our CS01-HS is paired with a Silverstone SST-ST30SF. This is a 300W 80 Plus Bronze unit. The benefit here is that our system will pull well under 100W even fully loaded. This particular PSU is not just compact, but it has another feature: it is silent in low power operating mode. The CS01-HS is limited to 130mm (SFX-L) PSU size, so it was important to find something that fit and was silent or quiet. This ticked both checkboxes.
Placing the PSU in the system was straightforward. You simply slide the PSU into position and screw it in. We would have liked easier access to the PSU thumb screws in the chassis. The lip of the case’s side gets in the way of direct access to some of the PSU thumb screws.
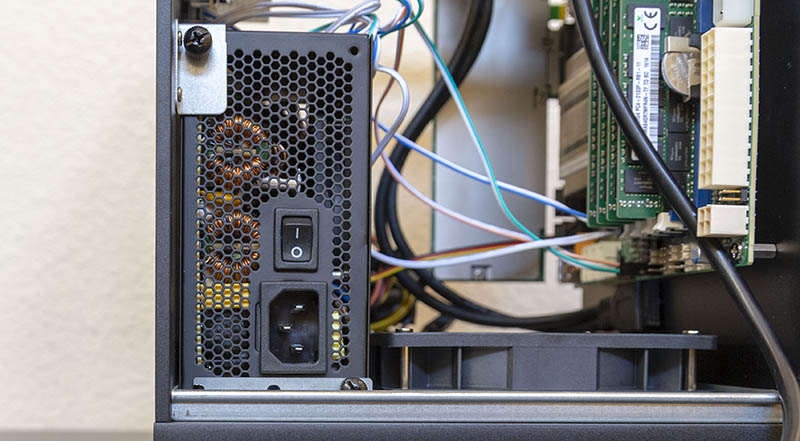
Remember to turn the PSU “ON” before closing the case. You will also then connect an internal power cable that gives the internal PSU a path to the I/O portion of the chassis.
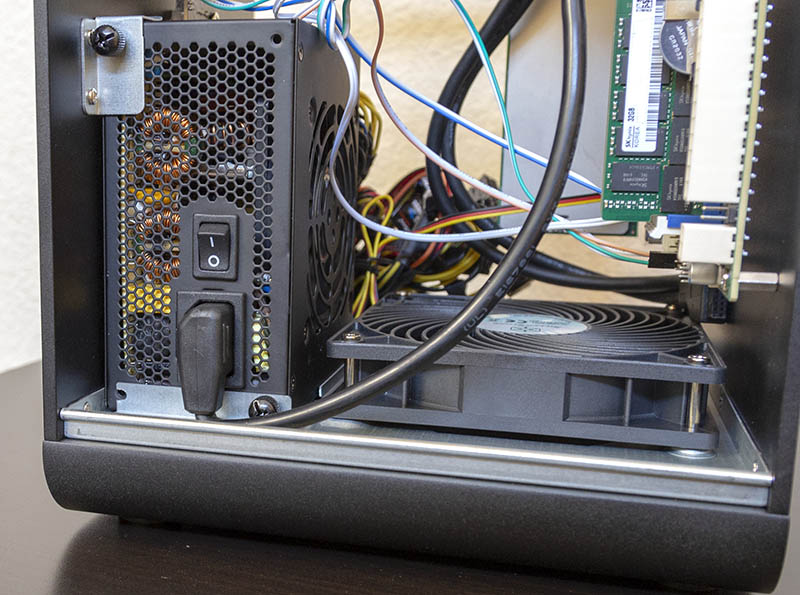
In the background, you can see the tails from the power cables. The PSU is not modular which means all of that cabling will need to be tucked away, even the ones we are not using.
Installing hard drives in trays is very easy. Since the trays are plastic, not metal, we wish that Silverstone had used a screwless mounting mechanism. Then again, 4 screws x 8 bays is 32 drive screws which is not too bad. Still, it would save several minutes of assembly time and going screwless in plastic is relatively easy.
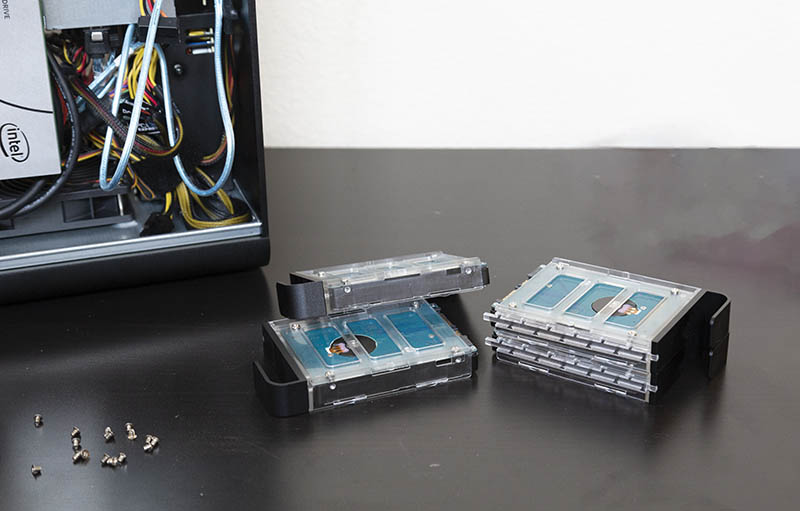
The one trick that may not be obvious from the overview is that the two internal drives you will want to be SSDs. They are in “hot swap” style drive trays, but have a direct SATA/ power connection to the backplane. See the top left of this photo:
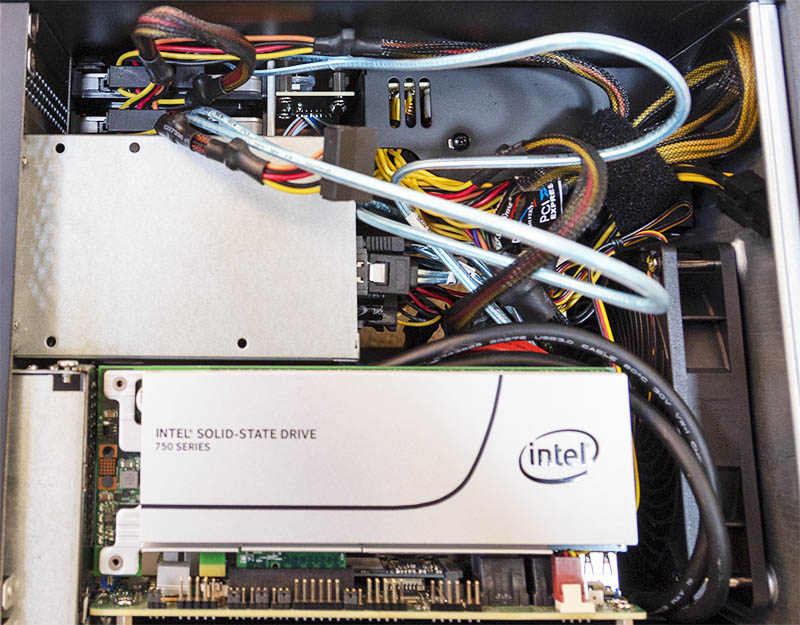
We took this shot just before cable ties and decided to show it rather than the slightly more cleaned up version. Inside the chassis, this case is tight. To service the movement of the drives and cages, you need extra cable length. Doing so means you have longer cables, and those cables need to go somewhere.
For one second, let us talk cabling. It is, really rough in here. Just taking a tally. There are:
- 8x SATA/ SAS 7-pin connections
- 2x Molex 4-pin power connections
- 2x SATA power connections
- 5x small header cables for the power and reset switches hard drive LED, and the power LED
- 1x ATX 20/24-pin power cable
- 1x Internal to external power cable
- 1x USB 3.0 “front panel” header cable (not used in our build, but available)
- 1x 120mm case fan power cable
We did not use the PCIe nor the auxiliary CPU power cables. We also did not have a CPU fan since we are using a passive heatsink. Still, that is 26 cables that are in a case packed with a PSU, motherboard and 8x 2.5″ bays.
We tried using SFF-8643 breakout cables, but the runs were shorter than any cables we had in the lab. Likewise, the SATA runs end up needing to be long enough to install while the 6-bay 2.5″ cage is outside of the chassis, but end up being very short when the cage is installed.
If you are maxing out the chassis, you are going to have to deal with 26 cables in a very compact area. Not using an add-in card would help, but we wanted to push this chassis to the limit.
This is not one where we would hope to have a clear case. The best course here: get it working. Get the cables out of the way of the chassis fan airflow as much as possible. Then close it up, and forget it exists. This is a storage server chassis after all. It is meant to sit reliably for years and just work.
Building the system took a while, but in the end, the Improbable Hyper-Converged NAS concept was brought to life. 16 cores, 40Gbps of networking, 128GB of RAM, an array of hard drives, SSDs and Intel Optane. This has just about everything one could want in a very compact package.
The Improbable Hyper-Converged NAS Impact
There are a few key observations one can make about this concept. First is the power consumption.
- Idle: 47W
- Boot: 52W
- Load: 74W
That may seem like a lot, but let us take a second to remember this has 16 cores and 128GB of RAM onboard:

Beyond that, there are six hard drives (4TB), one Intel Optane M.2, a NVMe AIC SSD, and two 960GB SATA SSDs. There is also 40Gbps worth of 10GbE networking, and a full baseboard management controller. That is an enormous system in such a small package.

One can certainly build a lower-power system, but we wanted to hit the upper end of what a configuration might look like in the Silverstone CS01-HS.
Comparing this to the Supermicro SC721 that we reviewed here Supermicro SYS-5029A-2TN4 Review: A small Intel Atom C3338 NAS, and Near silent powerhouse: Making a quieter MicroLab platform there is a major improvement. Cooling in the Supermicro SC721 is far from ideal. The chassis fan is mounted above the motherboard which means for this system we would have needed an active (noisy) CPU fan. Instead, we were able to simply use a passive heatsink. We were also able to use two more drives. If you are building, for example, a small virtualized Ceph cluster and want 2 hard drives for three nodes, that is easy in this type of chassis.
Final Words
The Silverstone CS01-HS and PSU are not inexpensive. At the same time, this build currently costs in the $3,200 range so the case and PSU are a single digit percentage of the total cost. You cannot get a more dense system that sips power and is as quiet as this solution.
There are a few areas of improvement for the CS01-HS. More attention could be paid to reducing the number of screws, and perhaps a motherboard tray design could be used to make installation that much easier. A PCB backplane for the dual 2.5″ internal bays would be welcome.
With all of this, we wanted to show the art of what is possible. Using a new 16 core CPU, with lots of I/O, and plenty of RAM, all in a compact, quiet, and low power package was not possible a year ago. Now, using the Silverstone CS01-HS we were able to make the Improbably Hyper-Converged NAS. A small mITX form factor hiding an immensely powerful system.
If you are attending VMworld 2018 this week in Las Vegas, this is the ultimate home lab / office lab platform you can get in a compact form factor right now.


Will you be using this for something or was it just an over the top example of what could be built?
This platform is being used with a few minor modifications (swapping to larger 1.92TB SATA SSDs for example) for some of the embedded/ edge testing infrastructure we have. I do want to upgrade it to 5TB hard drives at some point. We just had the 4TB drives on hand.
$3200? Did we miss a zero somewhere?
Are you thinking a making a follow-up on the software setup/config side?
No way this will run quietly when it gets warm, and it would probably start throttling soon when you really push it. Hope that 120 has a high top-end rpm!
Jon – we can. Right now we are using the setup we detailed here: https://www.youtube.com/watch?v=_xnKMFuv9kc and Ultimate Virtualization and Container Setup
Navi – this has done a number of benchmarking sessions. 46-47C is the hottest it has gotten thus far. Numbers are comparable to the active cooling version we tested Intel Atom C3958 benchmarks
Hard Drives: 6x 5TB
SATA SSDs: 2x 2TB
Write Cache: 1x Intel Optane 64GB
Read Cache: 1x Intel 400GB NVMe
Can you give a quick overview of what each type of storage will be used for? What will you be doing that you need 3 levels of speed?
Are you going to leave it in service without an I/O shield? I can imagine not having one helps from a cooling perspective but leaving it out means lot’s of the PCB is exposed. Presumably there is a reason they supply one.
Andrew – the hard drive with caches are for larger capacity items. For example, we generate about 1GB of log data per configuration we run through the test suite. Compressed, we generally serve 300GB of data or so to a host being tested during a run. Those then have to get analyzed. Usually, the SATA SSDs with low speed (10GbE) networking work decently well for VMs.
Goose – great question. These tend to work okay without I/O shields, but there is a lot exposed. We took that front-on photo also without the sides to let a bit more light in for the shot. In a horizontal orientation, it is a bit less of a concern. In a vertical orientation, the I/O shield is a good idea. We tried with the I/O shield and it was about 1C higher CPU temps under load but the ambient changed 0.2C so net 0.8C movement. Your observations are on point.
Thanks for the rapid response Patrick. It’s a very interesting idea and one that a friend of mine has explored. He used a U-NAS NSC-800 but you would buy the U-NAS NSC-810 nowhttp://www.u-nas.com/xcart/product.php?productid=17639&cat=249&page=1
Has all the features of the one you used but has 8 3.5″ instead of 6 2.5″
The issues he faced were that he used a consumer board and the fan on the heatsink failed, which because it’s so compact it’s a pain in the arse to change it.
We have the U-NAS 8-bay in the lab, the Silverstone is better quality and a better airflow design. It is a 2.5″ (8x including the internal bays) design as well.
Oh my bad it’s the 800 that has the 3.5″ disks. http://www.u-nas.com/xcart/product.php?productid=17617
Airflow for the motherboard isn’t the best but the disks are fine as they have 2x 120mm.
I can understand what you mean about quality though as silverstone and others such as lian-li make really high quality gear.
Great article, can you guys follow up with your recommended hyper-converged software and other fun stuff to add.
Thanks!
I am interested to see how those 2.5″ 4TB Seagates work for you. I know the article said they were SSDs but I cannot find a 4TB Seagate SSD anywhere on their site with that profile. Based on the one pic it looks like they have a hard drive controller board and room on the bottom for a spindle, so I am guessing they have to be these: https://www.seagate.com/www-content/product-content/barracuda-fam/barracuda-new/files/barracuda-2-5-ds1907-1-1609us.pdf
I built a 24 drive ZFS (Solaris 11.3) array with the 5TB version on a supermicro platform with a direct attach backplane and 3 SAS contollers and had nothing but issues with those drives. Under heavy load (was using as a Veeam backup target) the disk would timeout and then drop out of the array. All I could figure out was that the drives being SMR had issues with a CoW file system like ZFS.
Yes a follow up and how you configured the thier storage and a bit of the reasoning behind it.
The acticle referenced by Patrick is a good start to install the software side but stopped at thing mostly all on the is drive still.
Was wondering also if the 3200$ stated price includes all the drive and ram? Is this from regular web store like new egg, etc… ? Or there was a wholesale discount of some short?
*mostly on the os drive still
Cool NAS build but how does this qualify as Hyper-Converged?
Hyper-Converged architecture is a cluster architecture where compute, memory, and storage are spread between multiple nodes ensuring there is no single point of failure. This is a single board, single node NAS chassis so unless I missed something, this is anything but Hyper-Converged.
This case has several issues you guys should know.
1) It has very bad capacitors at backplane, after a year or two them could give short circuit and prevents system to power up. Easy to remove backplane or replace capacitors.
2) HDD Cage is a lack of ventilation. Any type of HDD will warm up. The only way to prevent burning of data – is removing backplane.
3) Bottom dust shield not centered with fan’s axis
4) SSD cage has all same problems as HDD cage.
I believe since this is one compute node, this is technically a Converged Infrastructure (CI), save the single points of failure (power). Hyper-converged Infrastructure implies multiple systems (think two, four, eight, etc.) of these CI nodes with all nodes being tightly-coupled with SDDC to greatly reduce the impact of a single or multiple nodes going offline.